b

Sunday, 20 January 2013

Consuming the Live Currency Conversion Web Service in WPF VB.NET

Consuming the Live Currency Conversion Web Service in WPF VB.NET

currency-converter-in-wpf-silverlight-xaml-using-C#-VB.net
Step 1)  Add Currency/Exchange convertor WebService Service reference into WPF Application.

Here I choose   http://www.webservicex.net/CurrencyConvertor.asmx?WSDL   Webservice


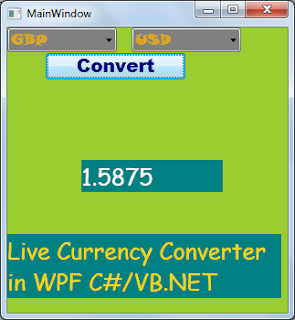
Step)Add 2 combo boxes and 1 button control and one TextBlock to XAML(as shown below)

        <ComboBox HorizontalAlignment="Left" VerticalAlignment="Top"
                  Width="120" Grid.Row="0" x:Name="cbxfrom" Tag="from"
                   Foreground="Goldenrod" Background="gray" FontFamily="Snap ITC" FontSize="16"
                  />
        <ComboBox HorizontalAlignment="Left" VerticalAlignment="Top"
                  Width="120" Grid.Row="0" Margin="136,0,0,0"
                  x:Name="cbxto" Tag="to"
                  Foreground="Goldenrod" Background="gray" FontFamily="Snap ITC" FontSize="16"
                  />
        <Button Content="Convert" HorizontalAlignment="Left"
                VerticalAlignment="Top"
                Width="153" Grid.Row="0" Margin="42,28,0,0"
                Click="Button_Click_1"
                 Foreground="Navy" Background="BlanchedAlmond" FontFamily="Arial Black" FontSize="20"  FontStyle="Italic"
                />
        <TextBlock HorizontalAlignment="Left" TextWrapping="Wrap" Text="TextBlock"
                   VerticalAlignment="Top"
                   Grid.Row="1" Margin="81,85,0,0" Width="155"
                   FontFamily="Comic Sans MS" FontSize="25" Foreground="white" Background="teal"
                   x:Name="txtConvValue"
                   />
 

Step 3) In the Convert Button Event handler

Calling web Service Method


Private Sub Button_Click_Converter(sender As Object, e As RoutedEventArgs)
    Dim from As [String] = TryCast(cbxfrom.SelectedValue, [String])

    Dim [to] As [String] = TryCast(cbxto.SelectedValue, [String])

    Dim convValue As Double = client.ConversionRate(DirectCast([Enum].Parse(GetType(CurService.Currency), from), CurService.Currency), DirectCast([Enum].Parse(GetType(CurService.Currency), [to]), CurService.Currency))

    txtConvValue.Text = convValue.ToString()
End Sub


Step 4) Here Currency converter Namespace is CurService
 
Dim client As CurService.CurrencyConvertorSoapClient = New CurrencyConvertorSoapClient()

Step 5) Load Currency Codes to Combobox


Private Sub LoadCurrencyCodes()
    Try
        Dim CurCodes As [String]() = [Enum].GetNames(GetType(CurService.Currency))

        cbxto.ItemsSource = CurCodes

        cbxfrom.ItemsSource = CurCodes
    Catch ex As Exception
        MessageBox.Show(ex.Message)
    End Try
End Sub


Here is the Output
Consuming the Live Currency Conversion Web Service in WPF C#

Consuming the Live Currency Conversion Web Service in WPF

currency-converter-in-wpf-silverlight-xaml-using-C#-VB.net
Step 1)  Add Currency/Exchange convertor WebService Service reference into WPF Application.

Here I choose   http://www.webservicex.net/CurrencyConvertor.asmx?WSDL   


Step)Add 2 combo boxes and 1 button control and one TextBlock to XAML(as shown below)

        <ComboBox HorizontalAlignment="Left" VerticalAlignment="Top"
                  Width="120" Grid.Row="0" x:Name="cbxfrom" Tag="from"
                   Foreground="Goldenrod" Background="gray" FontFamily="Snap ITC" FontSize="16"
                  />
        <ComboBox HorizontalAlignment="Left" VerticalAlignment="Top"
                  Width="120" Grid.Row="0" Margin="136,0,0,0"
                  x:Name="cbxto" Tag="to"
                  Foreground="Goldenrod" Background="gray" FontFamily="Snap ITC" FontSize="16"
                  />
        <Button Content="Convert" HorizontalAlignment="Left"
                VerticalAlignment="Top"
                Width="153" Grid.Row="0" Margin="42,28,0,0"
                Click="Button_Click_1"
                 Foreground="Navy" Background="BlanchedAlmond" FontFamily="Arial Black" FontSize="20"  FontStyle="Italic"
                />
        <TextBlock HorizontalAlignment="Left" TextWrapping="Wrap" Text="TextBlock"
                   VerticalAlignment="Top"
                   Grid.Row="1" Margin="81,85,0,0" Width="155"
                   FontFamily="Comic Sans MS" FontSize="25" Foreground="white" Background="teal"
                   x:Name="txtConvValue"
                   />
 

Step 3) In the Convert Button Event handler

Call web Service Method


private void Button_Click_1(object sender, RoutedEventArgs e)
{
String from=cbxfrom.SelectedValue as String;

String to=cbxto.SelectedValue as String;
double convValue= client.ConversionRate(

(CurService.Currency)Enum.Parse(typeof(CurService.Currency), from),
(CurService.Currency)Enum.Parse(typeof(CurService.Currency), to));

txtConvValue.Text = convValue.ToString();
}


Step 4) Here Currency converter Namespace is CurService
CurService.CurrencyConvertorSoapClient client = new CurrencyConvertorSoapClient();

Step 5) Load Currency Codes to Combobox


void LoadCurrencyCodes()
{
try
{
String[] CurCodes = Enum.GetNames(typeof(CurService.Currency));

cbxto.ItemsSource = CurCodes;
cbxfrom.ItemsSource = CurCodes;

}
catch (Exception ex)
{
MessageBox.Show(ex.Message);
}
}

Here is the Output


Friday, 18 January 2013

WPF TreeView File System VB.NET

WPF TreeView File System VB.NET


File-System-in-WPF-TreeView-C#-VB.NET
 Step 1)  Add TreeView to XAML
 <TreeView   ScrollViewer.IsDeferredScrollingEnabled="True" 
                    ScrollViewer.VerticalScrollBarVisibility="Auto"
                    x:Name="TreeView1"
                    HorizontalAlignment="Left" Height="287"
                    VerticalAlignment="Top" Width="489"
                    Margin="10,5,0,0" ToolTip="File System in WPF TreeView"
                    Grid.Row="01" Grid.Column="0"
                     BorderBrush="Beige" BorderThickness="1">
        </TreeView>
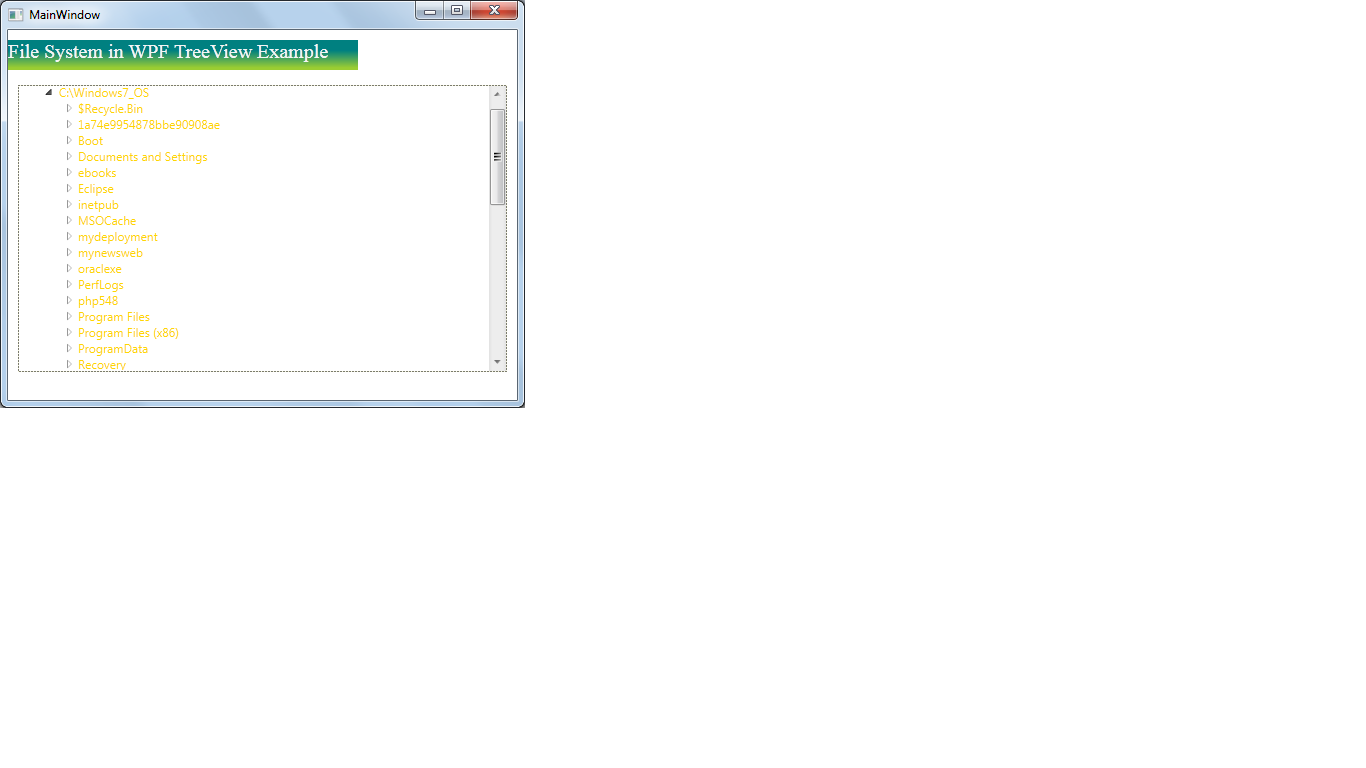
Step 2)  Add Root Node Called "Computer"
              note: This is the Root Node for the Tree,Logical Drives added below child nodes
Step 3) Get Logical Drives in the System from Environment class.
           Note: For Removable Drives , need to check IsReady

Private Sub TreeViewDemo_Loaded(sender As Object, e As RoutedEventArgs)
    Dim root As New TreeViewItem() With { _
        .Header = "Computer" _
    }
    TreeView1.Items.Add(root)
    root.Foreground = New SolidColorBrush(Colors.BlueViolet)
    For Each LogicalDrives As [String] In System.Environment.GetLogicalDrives()
        Dim dInfo As New System.IO.DriveInfo(LogicalDrives)


        Dim subItems As New TreeViewItem()
        subItems.Foreground = New SolidColorBrush(Colors.Gold)
        subItems.Header = LogicalDrives + (If((dInfo.IsReady), dInfo.VolumeLabel, [String].Empty))
        root.Items.Add(subItems)
        If dInfo.IsReady Then
            GetFilesandFolder(subItems, LogicalDrives)
        End If
    Next
End Sub
 
Step 4) Get Files and Folders of each(top level only) Logical Drives

Private Sub GetFilesandFolder(root As TreeViewItem, rootdir As [String])
    AddSubFolderandFiles(root, rootdir)
End Sub

Private Sub AddSubFolderandFiles(root As TreeViewItem, rootDir As [String])

    For Each dir As [String] In System.IO.Directory.GetDirectories(rootDir)
        Try

            Dim subFolderItem As New TreeViewItem()
            subFolderItem.Header = System.IO.Path.GetFileName(dir)
            subFolderItem.Items.Add("")
            subFolderItem.Expanded += subFolderItem_Expanded
            subFolderItem.Tag = dir
            root.Items.Add(subFolderItem)

            subFolderItem.Foreground = New SolidColorBrush(Colors.Gold)
        Catch ex As Exception
            Continue Try
        End Try
    Next

    For Each file As [String] In System.IO.Directory.GetFiles(rootDir)
        Dim item As New TreeViewItem()
        item.Header = System.IO.Path.GetFileName(file)
        item.Foreground = New SolidColorBrush(Colors.Green)

        root.Items.Add(item)
    Next
End Sub
 
 Step 5)  Sub Folder Expansion
 
Once Top Level Directories and Files are Added , Whenever user clicks/expands on Sub folder, at that time sub folder files & folder will be added to TreeView.
Private Sub subFolderItem_Expanded(sender As Object, e As RoutedEventArgs)

    Dim root As TreeViewItem = TryCast(sender, TreeViewItem)

    root.Items.Clear()

    Dim str As [String] = TryCast(root.Tag, [String])

    AddSubFolderandFiles(root, str)

    e.Handled = True 'Prevent Bubble Events

End Sub
                  

WPF TreeView File System C#

WPF TreeView File System C#


File-System-in-WPF-TreeView-C#-VB.NET
 Step 1)  Add TreeView to XAML

 <TreeView   ScrollViewer.IsDeferredScrollingEnabled="True" 
                    ScrollViewer.VerticalScrollBarVisibility="Auto"
                    x:Name="TreeView1"
                    HorizontalAlignment="Left" Height="287"
                    VerticalAlignment="Top" Width="489"
                    Margin="10,5,0,0" ToolTip="File System in WPF TreeView"
                    Grid.Row="01" Grid.Column="0"
                     BorderBrush="Beige" BorderThickness="1">
        </TreeView>

Step 2)  Add Root Node Called "Computer"
              note: This is the Root Node for the Tree,Logical Drives added below child nodes
Step 3) Get Logical Drives in the System from Environment class.
           Note: For Removable Drives , need to check IsReady

 void TreeViewDemo_Loaded(object sender, RoutedEventArgs e)
        {
            TreeViewItem root = new TreeViewItem() { Header = "Computer" };
            TreeView1.Items.Add(root);
            root.Foreground = new SolidColorBrush(Colors.BlueViolet);
            foreach (String LogicalDrives in System.Environment.GetLogicalDrives())
            {
                System.IO.DriveInfo dInfo = new System.IO.DriveInfo(LogicalDrives);

               
                TreeViewItem subItems = new TreeViewItem();
                subItems.Foreground = new SolidColorBrush(Colors.Gold);
                subItems.Header = LogicalDrives + ((dInfo.IsReady)?dInfo.VolumeLabel:String.Empty);
                root.Items.Add(subItems);
                if(dInfo.IsReady)
                GetFilesandFolder(subItems,LogicalDrives);
            }
        }
Step 4) Get Files and Folders of each(top level only) Logical Drives

        void GetFilesandFolder(TreeViewItem root,String rootdir)
        {
            AddSubFolderandFiles(root,rootdir);
        }

       void AddSubFolderandFiles(TreeViewItem root,String rootDir)
        {
           
            foreach (String dir in System.IO.Directory.GetDirectories(rootDir))
            {
                try
                {
                   
                    TreeViewItem subFolderItem = new TreeViewItem();
                    subFolderItem.Header = System.IO.Path.GetFileName(dir);
                    subFolderItem.Items.Add("");
                    subFolderItem.Expanded +=subFolderItem_Expanded;
                    subFolderItem.Tag = dir;
                    root.Items.Add(subFolderItem);

                    subFolderItem.Foreground = new SolidColorBrush(Colors.Gold);
                }
                catch (Exception ex)
                {
                    continue;
                }
            }

            foreach (String file in System.IO.Directory.GetFiles(rootDir))
            {
                TreeViewItem item = new TreeViewItem();
                item.Header = System.IO.Path.GetFileName(file);
                item.Foreground = new SolidColorBrush(Colors.Green);
                root.Items.Add(item);
                       
            }
       }

 Step 5)  Once Top Level Directories and Files are Added , Whenever user clicks/expands on Sub folder, at that time sub folder files & folder will be added to TreeView.

     void subFolderItem_Expanded(object sender, RoutedEventArgs e)
       {

           TreeViewItem root = sender as TreeViewItem;

           root.Items.Clear();

           String str = root.Tag as String;

           AddSubFolderandFiles(root, str);

           e.Handled = true;

       }


string to color converter wpf VB.NET

string to color converter wpf VB.NET

string to color converter wpf


          Add System.Windows.Media;


Dim newColor As Color = DirectCast(ColorConverter.ConvertFromString("Red"), Color)

         String to Color object converstion in WPF


string to color converter wpf C#

string to color converter wpf


          Add System.Windows.Media;


        Color newColor = (Color)ColorConverter.ConvertFromString("Red");

         String to Color object converstion in WPF


Color Picker ComoBox in WPF VB.NET


Color Picker ComoBox in WPF VB.NET

Color Picker ComoBox in WPF C# VB.NET XAML .net 4.5
Color Picker ComoBox in WPF C#

  This example explains How to populate WPF Supported Colors into ComboBox.
and then select each color in the Combobox ,it Draws a Rectangle with selected one.

Step 1)  Add ComboBox and one Rectangle to XAML Page/UserControl

        <Rectangle Fill="black"  Grid.Row="2" Grid.Column="0"
                   Grid.ColumnSpan="2"
                   HorizontalAlignment="Left"
                   Height="100" Stroke="Black"
                   VerticalAlignment="Top" Width="300"
                   x:Name="Rectangle1"
                   />
        <ComboBox HorizontalAlignment="Left" VerticalAlignment="Top"
                  Width="158"
                  x:Name="colorCombo" SelectionChanged="colorCombo_SelectionChanged"
                  ItemsSource="{Binding}" Grid.Row="1" Grid.Column="01"
                   Height="22"
                  >
        </ComboBox>

Step 2) Add SelectionChanged Event handler for ComboBox

Step 3) Fill Combobox with Colors
Before that, as you seen in the Image,Item in the combo box has 2 elements
                  1.Rectangle
                  2.TextBlock
So Putting these UI elements in StatckPanel with Orientation Horizontal.

i.e Each Combobox element is one StackPanel

Private Sub ColorPickerComboBoxDemo_Loaded(sender As Object, e As RoutedEventArgs)
    Try

        Dim colorProp As System.Reflection.PropertyInfo() = GetType(Colors).GetProperties()
        listOfColor = New [String](colorProp.Length - 1) {}
        Dim i As Integer = 0
        For Each pi As System.Reflection.PropertyInfo In colorProp
            colorCombo.Items.Add(GetStackPanel(pi.Name))
        Next
    Catch ex As Exception
        MessageBox.Show(ex.Message)
    End Try
End Sub


Private Function GetStackPanel(strColor As [String]) As StackPanel
    Dim ColorsStack As New StackPanel()
    ColorsStack.Orientation = Orientation.Horizontal
    Dim rect As New Rectangle()
    rect.Width = 20
    rect.Height = 20
    Dim newColor As Color = DirectCast(ColorConverter.ConvertFromString(strColor), Color)
    rect.Fill = New SolidColorBrush(newColor)
    'rect.Stroke = 2;
    Dim blk As New TextBlock()
    blk.Text = strColor
    ColorsStack.Children.Add(rect)
    ColorsStack.Children.Add(blk)
    Return ColorsStack
End Function

Step 4)   Filling Rectangle in ComoBox SelectionIndexChanged Event Handler

Private Sub colorCombo_SelectionChanged(sender As Object, e As SelectionChangedEventArgs)
    'Stack Panel has 2 elements one small colored rect
    'Another one TextBlock.
    Dim selPanel As StackPanel = TryCast(colorCombo.SelectedValue, StackPanel)
    Dim txtBlk As TextBlock = TryCast(selPanel.Children(1), TextBlock)
    Dim newColor As Color = DirectCast(ColorConverter.ConvertFromString(txtBlk.Text), Color)
    Rectangle1.Fill = New SolidColorBrush(newColor)
End Sub

Step 5) Run the Application

OUTPUT
Color Picker ComoBox in WPF C# VB.NET XAML .net 4.5


Tags:Color Picker ComoBox in WPF VB.NET VB.NET XAML .net 4.5,using a combobox to select a color,Combo color picker wpf, ColorPicker WPF VB.NET,WPF color picker combobox,WPF Combobox, WPF Rectangle,WPF ComboBox SelectionChanged,CustomFont in WPF,WPF ComboBox DataContext.

Color Picker ComoBox in WPF C#

Color Picker ComoBox in WPF C# VB.NET XAML .net 4.5
Color Picker ComoBox in WPF C#

  This example explains How to populate WPF Supported Colors into ComboBox.
and then select each color in the Combobox ,it Draws a Rectangle with selected one.

Step 1)  Add ComboBox and one Rectangle to XAML Page/UserControl

        <Rectangle Fill="black"  Grid.Row="2" Grid.Column="0"
                   Grid.ColumnSpan="2"
                   HorizontalAlignment="Left"
                   Height="100" Stroke="Black"
                   VerticalAlignment="Top" Width="300"
                   x:Name="Rectangle1"
                   />
        <ComboBox HorizontalAlignment="Left" VerticalAlignment="Top"
                  Width="158"
                  x:Name="colorCombo" SelectionChanged="colorCombo_SelectionChanged"
                  ItemsSource="{Binding}" Grid.Row="1" Grid.Column="01"
                   Height="22"
                  >
        </ComboBox>

Step 2) Add SelectionChanged Event handler for ComboBox

Step 3) Fill Combobox with Colors
Before that, as you seen in the Image,Item in the combo box has 2 elements
                  1.Rectangle
                  2.TextBlock
So Putting these UI elements in StatckPanel with Orientation Horizontal.

i.e Each Combobox element is one StackPanel

        void ColorPickerComboBoxDemo_Loaded(object sender, RoutedEventArgs e)
        {
        try
        {
       
        System.Reflection.PropertyInfo[] colorProp=typeof(Colors).GetProperties();
        listOfColor =  new String[colorProp.Length];
        int i=0;
        foreach (System.Reflection.PropertyInfo pi in colorProp)
        {
                colorCombo.Items.Add(GetStackPanel(pi.Name));
        }
        }
        catch (Exception ex)
        {
        MessageBox.Show(ex.Message);
        }
        }


        StackPanel GetStackPanel(String strColor)
        {
        StackPanel ColorsStack = new StackPanel();
        ColorsStack.Orientation = Orientation.Horizontal;
        Rectangle rect = new Rectangle();
        rect.Width = 20;
        rect.Height = 20;
        Color newColor = (Color)ColorConverter.ConvertFromString(strColor);
        rect.Fill = new SolidColorBrush(newColor);
        //rect.Stroke = 2;
        TextBlock blk = new TextBlock();
        blk.Text = strColor;
        ColorsStack.Children.Add(rect);
        ColorsStack.Children.Add(blk);
        return ColorsStack;
        }


Step 4)   Filling Rectangle in ComoBox SelectionIndexChanged Event Handler

        private void colorCombo_SelectionChanged(object sender,
                         SelectionChangedEventArgs e)
        {
         //Stack Panel has 2 elements one small colored rect
        //Another one TextBlock.

        StackPanel selPanel = colorCombo.SelectedValue as StackPanel;
        TextBlock txtBlk=selPanel.Children[1] as TextBlock;
        Color newColor = (Color)ColorConverter.ConvertFromString(txtBlk.Text);
        Rectangle1.Fill = new SolidColorBrush(newColor);
        }
Step 5) Run the Application

Color Picker ComoBox in WPF C# VB.NET XAML .net 4.5


Tags:Color Picker ComoBox in WPF C# VB.NET XAML .net 4.5,using a combobox to select a color,Combo color picker wpf, ColorPicker WPF C#,WPF color picker combobox,WPF Combobox, WPF Rectangle,WPF ComboBox SelectionChanged,CustomFont in WPF,WPF ComboBox DataContext.

Thursday, 10 January 2013

TabControl in WPF C#/VB.NET

TabControl in WPF C#/VB.NET


TabControl example in WPF  C#/VB.NET
TabControl in WPF


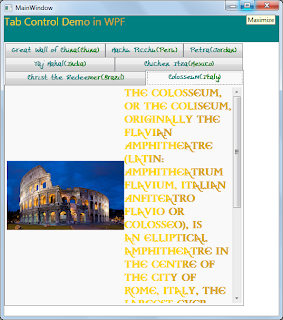
TabControl has set of tabs. Its mainly used to view multiple sections/categories  in the same page.
This example has 7 tabs(7wonders). Each tab speaks about one wonders of the world.

Step 1) Drag & Drop TabControl
             add as many TabItems

              <TabControl>
                  <TabItem Header="Taj Mahal"/>
                 <TabItem Header="Colosseum"/>
                </TabControl>

Step 2) Create Styles for each tab header
            <Style x:Key="tabForeKey" TargetType="TabItem">
                <Setter Property="FontWeight" Value="ExtraBold"></Setter>
                <Setter  Property="Foreground">
                    <Setter.Value>
                        <LinearGradientBrush StartPoint="0.5,0" EndPoint="0.89,0.99">
                            <GradientStop Color="teal" Offset="0.23"></GradientStop>
                            <GradientStop Color="Green"  Offset="0.56"></GradientStop>
                        </LinearGradientBrush>
                    </Setter.Value>
                </Setter>
            </Style>

Step 3) Create Styles to Content in Each TabItem

            <Style x:Key="textForeKey" TargetType="TextBlock">
                <Setter  Property="Foreground">
                    <Setter.Value>
                        <LinearGradientBrush StartPoint="0.5,0" EndPoint="0.89,0.99">
                            <GradientStop Color="Gold" Offset="0.23"></GradientStop>
                            <GradientStop Color="Goldenrod"  Offset="0.56"></GradientStop>
                        </LinearGradientBrush>
                    </Setter.Value>
                </Setter>
            </Style>

Step 4) Apply Styles to TabItem Header

            <TabItem Header="Taj Mahal(India)"
                     FontFamily="fonts/tullyshandregular.ttf#TullysHand"
                     Style="{StaticResource tabForeKey}"
                     ScrollViewer.VerticalScrollBarVisibility="Visible"
                       ScrollViewer.HorizontalScrollBarVisibility="Visible"
                     >


Step 5) Apply Styles to Content in TabItem


                    <TextBlock Grid.Column="01" Grid.Row="0"
                        FontFamily="Baris Cerin Regular"  FontSize="16" TextWrapping="Wrap"
                       Style="{StaticResource textForeKey}" >

Step 6)  Run The Application


Without  Creating Resources also We can create tabcontrol in WPF/XAML

Note:  This example uses Multiline Textblock ,ScrollViewer, and Grid Layout


<Page x:Class="Wpfone.tabcontrol_demo1"
      xmlns="http://schemas.microsoft.com/winfx/2006/xaml/presentation"
      xmlns:x="http://schemas.microsoft.com/winfx/2006/xaml"
      xmlns:mc="http://schemas.openxmlformats.org/markup-compatibility/2006"
      xmlns:d="http://schemas.microsoft.com/expression/blend/2008"
      mc:Ignorable="d"
      d:DesignHeight="500" d:DesignWidth="500"
    Title="tabcontrol_demo1">

    <Grid>
        <Grid.Resources>
            <Style x:Key="textForeKey" TargetType="TextBlock">
                <Setter  Property="Foreground">
                    <Setter.Value>
                        <LinearGradientBrush StartPoint="0.5,0" EndPoint="0.89,0.99">
                            <GradientStop Color="Gold" Offset="0.23"></GradientStop>
                            <GradientStop Color="Goldenrod"  Offset="0.56"></GradientStop>
                        </LinearGradientBrush>
                    </Setter.Value>
                </Setter>
            </Style>
            <Style x:Key="tabForeKey" TargetType="TabItem">
                <Setter Property="FontWeight" Value="ExtraBold"></Setter>
                <Setter  Property="Foreground">
                    <Setter.Value>
                        <LinearGradientBrush StartPoint="0.5,0" EndPoint="0.89,0.99">
                            <GradientStop Color="teal" Offset="0.23"></GradientStop>
                            <GradientStop Color="Green"  Offset="0.56"></GradientStop>
                        </LinearGradientBrush>
                    </Setter.Value>
                </Setter>
            </Style>


        </Grid.Resources>
        <Grid.RowDefinitions>
            <RowDefinition Height="50"></RowDefinition>
            <RowDefinition></RowDefinition>
        </Grid.RowDefinitions>
        <TextBlock Text="Tab Control Demo in WPF"
                   Grid.Column="0" Grid.Row="0"
                   Style="{StaticResource textForeKey}"
                   FontFamily="times"
                   FontSize="20"
                   Background="teal"
                   ></TextBlock>
        <TabControl Grid.Column="0" Grid.Row="1" x:Name="SevenWondersTabControl1" HorizontalAlignment="Left"
Height="500" VerticalAlignment="Top" Width="455">
            <TabControl.Resources>
            </TabControl.Resources>
            <TabItem Header="Taj Mahal(India)"
                     FontFamily="fonts/tullyshandregular.ttf#TullysHand"
                     Style="{StaticResource tabForeKey}"
                     ScrollViewer.VerticalScrollBarVisibility="Visible"
                       ScrollViewer.HorizontalScrollBarVisibility="Visible"
                     >
                <Grid>
                    <Grid.RowDefinitions>
                        <RowDefinition></RowDefinition>
                    </Grid.RowDefinitions>
                    <Grid.ColumnDefinitions>
                        <ColumnDefinition></ColumnDefinition>
                        <ColumnDefinition  ScrollViewer.VerticalScrollBarVisibility="Visible"
                       ScrollViewer.HorizontalScrollBarVisibility="Auto"></ColumnDefinition>
                    </Grid.ColumnDefinitions>
                    <Image Grid.Column="0" Grid.Row="0"
                           Source="http://tinyurl.com/az89umz" />
                    <ScrollViewer Grid.Column="1" Grid.Row="0">
                    <TextBlock Grid.Column="01" Grid.Row="0"
                        FontFamily="Baris Cerin Regular"  FontSize="16" TextWrapping="Wrap"
                       Style="{StaticResource textForeKey}"
>
                    <Run>
                    The Taj Mahal (/ˈtɑːdʒ məˈhɑːl/ often pron.: /ˈtɑːʒ/;[1] Hindi: ताज महल, from Persian/Urdu:
                        تاج محل‎ "crown of palaces", pronounced
                    </Run>
                    <LineBreak/>
                    <Run>[ˈt̪aːdʒ mɛˈɦɛl]; also "the Taj"[2]) is a white marble mausoleum located in Agra,
                        Uttar Pradesh, India. It was built by Mughal emperor Shah Jahan in </Run>
                    <LineBreak></LineBreak>
                    <Run>
                        memory of his third wife, Mumtaz Mahal. The Taj Mahal is widely recognized as
                        "the jewel of Muslim art in India and one of the universally</Run>
                    <LineBreak></LineBreak>
                    <Run>
                    admired masterpieces of the world's heritage"
                    </Run>
                    </TextBlock>
                    </ScrollViewer>
                </Grid>
            </TabItem>
            <TabItem Header="Chichen Itza(Mexico)"
                     FontFamily="fonts/tullyshandregular.ttf#TullysHand"
                     Style="{StaticResource tabForeKey}" >
                <Grid>
                    <Grid.RowDefinitions>
                        <RowDefinition></RowDefinition>
                    </Grid.RowDefinitions>
                    <Grid.ColumnDefinitions>
                        <ColumnDefinition></ColumnDefinition>
                        <ColumnDefinition  ScrollViewer.VerticalScrollBarVisibility="Visible"
                       ScrollViewer.HorizontalScrollBarVisibility="Auto"></ColumnDefinition>
                    </Grid.ColumnDefinitions>
                    <Image Grid.Column="0" Grid.Row="0"
                           Source="http://tinyurl.com/akox5pv" />
                    <ScrollViewer Grid.Column="1" Grid.Row="0">
                        <TextBlock Grid.Column="01" Grid.Row="0"
                        FontFamily="Baris Cerin Regular"  FontSize="16" TextWrapping="Wrap"
                       Style="{StaticResource textForeKey}"
>
                    <Run>
Chichen Itza was a major focal point in the northern Maya lowlands from the Late Classic (c.600–900 AD)
through the Terminal Classic (c.800–900) and into the early portion of the Early Postclassic period (c.900–1200).
The site exhibits a multitude of architectural styles, reminiscent of styles
                    </Run>
                    <LineBreak/>
                    <Run>
seen in central Mexico and of the Puuc and Chenes styles of the northern Maya lowlands.
The presence of central Mexican styles was once thought to have been representative of
direct migration or even conquest from central Mexico, but most contemporary interpretations view the
                    </Run>
                    <LineBreak></LineBreak>
                    <Run>
presence of these non-Maya styles more as the result of cultural diffusion.
                    </Run>
                    <LineBreak></LineBreak>
                        </TextBlock>
                    </ScrollViewer>
                </Grid>
            </TabItem>
            <TabItem Header="Christ the Redeemer(Brazil)"
                     FontFamily="fonts/tullyshandregular.ttf#TullysHand"
                     Style="{StaticResource tabForeKey}">
                <Grid>
                    <Grid.RowDefinitions>
                        <RowDefinition></RowDefinition>
                    </Grid.RowDefinitions>
                    <Grid.ColumnDefinitions>
                        <ColumnDefinition></ColumnDefinition>
                        <ColumnDefinition  ScrollViewer.VerticalScrollBarVisibility="Visible"
                       ScrollViewer.HorizontalScrollBarVisibility="Auto"></ColumnDefinition>
                    </Grid.ColumnDefinitions>
                    <Image Grid.Column="0" Grid.Row="0"
                           Source="http://tinyurl.com/alrn7ut" />
                    <ScrollViewer Grid.Column="1" Grid.Row="0">
                        <TextBlock Grid.Column="01" Grid.Row="0"
                        FontFamily="Baris Cerin Regular"  FontSize="16" TextWrapping="Wrap"
                       Style="{StaticResource textForeKey}"
>
                    <Run>
The Cristo Redentor (English: lit. Christ the Redeemer, Portuguese: Cristo Redentor, standard) is a statue of
                        Jesus of Nazareth in Rio de Janeiro, Brazil; considered the largest Art Deco statue in
                        the world and the 5th largest statue of Jesus in the world. It is 30.1 metres (99 ft)
                   
                    </Run>
                    <LineBreak/>
                    <Run>
tall, not including its 9.5 metres (31 ft) pedestal, and 30 metres (98 ft) wide. It weighs 635 tonnes
(625 long,700 short tons), and is located at the peak of the 700-metre (2,300 ft)
Corcovado mountain in the Tijuca Forest National Park overlooking the city.
                    </Run>
                    <LineBreak></LineBreak>
                    <Run>
 A symbol of Brazilian Christianity, the statue has become an icon for Rio de Janeiro and Brazil.[1]
                        It is made of reinforced concrete and soapstone, and was constructed between
                        1922 and 1931.[2][3][4]
                    </Run>
                    <LineBreak></LineBreak>
                        </TextBlock>
                    </ScrollViewer>
                </Grid>
            </TabItem>
            <TabItem Header="Colosseum(Italy)"
                     FontFamily="fonts/tullyshandregular.ttf#TullysHand"
                     Style="{StaticResource tabForeKey}">
                <Grid>
                    <Grid.RowDefinitions>
                        <RowDefinition></RowDefinition>
                    </Grid.RowDefinitions>
                    <Grid.ColumnDefinitions>
                        <ColumnDefinition></ColumnDefinition>
                        <ColumnDefinition  ScrollViewer.VerticalScrollBarVisibility="Visible"
                       ScrollViewer.HorizontalScrollBarVisibility="Auto"></ColumnDefinition>
                    </Grid.ColumnDefinitions>
                    <Image Grid.Column="0" Grid.Row="0"
                           Source="http://tinyurl.com/b899lh8" />
                    <ScrollViewer Grid.Column="1" Grid.Row="0">
                        <TextBlock Grid.Column="01" Grid.Row="0"
                        FontFamily="Baris Cerin Regular"  FontSize="16" TextWrapping="Wrap"
                       Style="{StaticResource textForeKey}"
>
                    <Run>
The Colosseum, or the Coliseum, originally the Flavian Amphitheatre (Latin: Amphitheatrum Flavium, Italian
                        Anfiteatro Flavio or Colosseo), is
                    </Run>
                    <LineBreak/>
                    <Run>
                   
an elliptical amphitheatre in the centre of the city of Rome, Italy, the largest ever built
                        in the Roman Empire, built of concrete and stone.[1] It is                    
                    </Run>
                    <LineBreak></LineBreak>
                    <Run>
considered one of the greatest works of Roman architecture and Roman engineering.
                    </Run>
                    <LineBreak></LineBreak>
                        </TextBlock>
                    </ScrollViewer>
                </Grid>
            </TabItem>
            <TabItem Header="Great Wall of China(China)"
                     FontFamily="fonts/tullyshandregular.ttf#TullysHand"
                     Style="{StaticResource tabForeKey}">
                <Grid>
                    <Grid.RowDefinitions>
                        <RowDefinition></RowDefinition>
                    </Grid.RowDefinitions>
                    <Grid.ColumnDefinitions>
                        <ColumnDefinition></ColumnDefinition>
                        <ColumnDefinition  ScrollViewer.VerticalScrollBarVisibility="Visible"
                       ScrollViewer.HorizontalScrollBarVisibility="Auto"></ColumnDefinition>
                    </Grid.ColumnDefinitions>
                    <Image Grid.Column="0" Grid.Row="0"
                           Source="http://tinyurl.com/acryvu4" />
                    <ScrollViewer Grid.Column="1" Grid.Row="0">
                        <TextBlock Grid.Column="01" Grid.Row="0"
                        FontFamily="Baris Cerin Regular"  FontSize="16" TextWrapping="Wrap"
                       Style="{StaticResource textForeKey}"
>
                    <Run>
The Great Wall of China is a series of fortifications made of stone, brick, tamped earth,
wood, and other materials, generally built along an east-to-west line across the historical
northern borders of China in part to protect the Chinese Empire or its prototypical
states against intrusions by various nomadic groups or military incursions by various
warlike peoples or forces. Several walls were being built as early as the 7th century
                    </Run>
                    <LineBreak/>
                    <Run>
BC;[3] these, later joined together and made bigger, stronger, and unified are now collectively
referred to as the Great Wall.[4] Especially famous is the wall built between
                    </Run>
                    <LineBreak></LineBreak>
                    <Run>
220–206 BC by the first Emperor of China, Qin Shi Huang. Little of that wall remains. Since then,
                      </Run>
                              <LineBreak></LineBreak>
                    <Run>
                     
the Great Wall has on and off been rebuilt, maintained, and enhanced; the majority of the
existing wall was reconstructed during the Ming Dynasty.
                    </Run>
                        </TextBlock>
                    </ScrollViewer>
                </Grid>
            </TabItem>
            <TabItem Header="Machu Picchu(Peru)"
                     FontFamily="fonts/tullyshandregular.ttf#TullysHand"
                     Style="{StaticResource tabForeKey}">
                <Grid>
                    <Grid.RowDefinitions>
                        <RowDefinition></RowDefinition>
                    </Grid.RowDefinitions>
                    <Grid.ColumnDefinitions>
                        <ColumnDefinition></ColumnDefinition>
                        <ColumnDefinition  ScrollViewer.VerticalScrollBarVisibility="Visible"
                       ScrollViewer.HorizontalScrollBarVisibility="Auto"></ColumnDefinition>
                    </Grid.ColumnDefinitions>
                    <Image Grid.Column="0" Grid.Row="0"
                           Source="http://tinyurl.com/arcdxab" />
                    <ScrollViewer Grid.Column="1" Grid.Row="0">
                        <TextBlock Grid.Column="01" Grid.Row="0"
                        FontFamily="Baris Cerin Regular"  FontSize="16" TextWrapping="Wrap"
                       Style="{StaticResource textForeKey}"
>
                    <Run>
Machu Picchu (Spanish pronunciation: [ˈmatʃu ˈpiktʃu], Quechua: Machu Picchu [ˈmɑtʃu ˈpixtʃu], "Old Peak")
                        is a pre-Columbian 15th-century Inca
                    </Run>
                    <LineBreak/>
                    <Run>
site located 2,430 metres (7,970 ft) above sea level.[1][2] Machu Picchu is located in the Cusco Region of Peru,
South America. It is situated on a mountain ridge above the Urubamba Valley in Peru, which is 80 kilometres (50 mi)
northwest of Cusco and through which the Urubamba River
 </Run>
                    <LineBreak></LineBreak>
                    <Run>
flows. Most archaeologists believe that Machu Picchu was built as an estate for the
Inca emperor Pachacuti (1438–1472). Often referred to as the "City of the Incas",
it is perhaps the most familiar icon of Inca civilization.
</Run>
                    <LineBreak></LineBreak>
                        </TextBlock>
                    </ScrollViewer>
                </Grid>
            </TabItem>
            <TabItem Header="Petra(Jordan)"
                     FontFamily="fonts/tullyshandregular.ttf#TullysHand"
                     Style="{StaticResource tabForeKey}">
                <Grid>
                    <Grid.RowDefinitions>
                        <RowDefinition></RowDefinition>
                    </Grid.RowDefinitions>
                    <Grid.ColumnDefinitions>
                        <ColumnDefinition></ColumnDefinition>
                        <ColumnDefinition  ScrollViewer.VerticalScrollBarVisibility="Visible"
                       ScrollViewer.HorizontalScrollBarVisibility="Auto"></ColumnDefinition>
                    </Grid.ColumnDefinitions>
                    <Image Grid.Column="0" Grid.Row="0"
                           Source="http://tinyurl.com/atflxrd" />
                    <ScrollViewer Grid.Column="1" Grid.Row="0">
                        <TextBlock Grid.Column="01" Grid.Row="0"
                        FontFamily="Baris Cerin Regular"  FontSize="16" TextWrapping="Wrap"
                       Style="{StaticResource textForeKey}"
>
                    <Run>
Petra (Greek πέτρα (petra), meaning 'stone'; Arabic: البتراء, Al-Batrāʾ) is an
Arabian historical and archaeological city in the Jordanian governorate of
                   
                    </Run>
                    <LineBreak/>
                    <Run>Ma'an, that is famous for its rock-cut architecture and water conduit system.</Run>
                    <LineBreak></LineBreak>
                        </TextBlock>
                    </ScrollViewer>
                </Grid>
            </TabItem>
        </TabControl>

    </Grid>
</Page>